WHAT'S NEW?
Loading...

No this is not really a vulnerability, but just really bad documentation. [here it is][on wayback]


Homeassistant documentation is missing a very important part, setting the ZigBee Network Key. There is no mention of the ZigBee key anywhere on docs, shame on you HA. By default, the program behind the ZHA, called Zigpy, will fall back to the default key set by ZigBee Alliance and defined in the Zigpy source file zigpy_znp/const.py and in hex format the key is 

01:03:05:07:09:0B:0D:0F:00:02:04:06:08:0A:0C:0D


You can not see your network key from the Homeassistan panel/dashboard, you must go to the command line of the Homeassistant installation, find out in which TTY your ZigBee is, and read the info

zigpy radio znp /dev/ttyACM0 info

PAN ID:                0x1A42
Extended PAN ID:       2b:8c:2d:09:40:52:a4:0e
Channel:               11
Channel mask:          [11]
NWK update ID:         0
Device IEEE:           88:02:4b:11:18:d2:f0:a1
Device NWK:            0x0000
Network key:           01:03:05:07:09:0b:0d:0f:00:02:04:06:08:0a:0c:0d
Network key sequence:  0

Network key counter:   5397745


IF YOU DO NOT CHANGE YOUR ZIGBEE NETWORK KEY, YOU ARE VULNERABLE TO ATTACS!


see https://www.zigbee2mqtt.io/advanced/zigbee/04_sniff_zigbee_traffic.html#_3-sniffing-traffic

Zigpy and ZHA install process seems to be missing a network key generator. It is a common practice, to generate a key, when installing whatever software, that uses a key for something. You can use the Javascript ZigBee Network Key Generator below.


configuration.yaml should have the ZigBee network key set BEFORE you create your network.
Otherwise, unsecure known default key will be used!

zha:
  zigpy_config:
    network:
      key: [...]


If you installed HA directly on the computer, you probably need to install zigpy-cli first. Login to your HA computer first, and then switch to homeassistant user using sudo:

sudo -u homeassistant -H -s
cd /srv/homeassistant
python3 -m venv .
source bin/activate
pip install zigpy-cli
# find your usb zigbee TTY..
dmesg
# then try read your network info
zigpy radio znp /dev/ttyACM0 info


You may have several USB radios (Bluetooth, Z-Wave etc.), try find the righ one, /dev/ttyACM0, /dev/ttyACM1, /dev/ttyACM2


Re-create your network with a new key

After adding your newly generated key to configuration.yaml file, you can reset the ZigBee network from the command line. I tried removing the ZHA Intergration from the HA Dashboard and then add it again, but it failed.


After I reset the network from command line, adding the ZHA Integration worked.


zigpy radio znp /dev/ttyACM1 reset
zigpy radio znp /dev/ttyACM1 form
zigpy radio znp /dev/ttyACM1 info


The info command did now show the new generated network key, and none of my lights or devices worked anymore. Good! 


After this I tried to click the Reconfigure device from the Dashboard, but it did not work so I ended up removing all my ZigBee devices and then added them again by putting them to pairing mode and adding via Dashboard by clicking the Add device.


I now have a randomly generated network key and secure ZigBee network!

There are at least two different main types of positioning applications.

First, the moving object or person is positioning its own location inside a space, relative to the static beacons, of which location is known. For example a person is navigating inside a shopping mall, where beacons attached to walls do not move. This application has at least three beacons and one receiver (for trilateration).

Second, moving beacon (object or person) is being located inside a space, with the help of a static receiver stations, of which location is known. This application has at least one beacon and three stations (for trilateration).

DC-DC Step-Down/buck converter module and ESP32

ESP32 as a locator station

This simple demo application is built for the second example. Three ESP32 Bluetooth receiver stations statically installed in office space, are reporting the RSSI of all visible bluetooth devices via WiFi connection to a message broker using MQTT protocol. In this arrangement, there is no limit for the amount of ESP32 stations or the size of the building space. Only three stations with strongest RSSI will be used to calculate position of a moving beacon.


Requirements


Open the Arduino sketch (arduino-esp32) for the station from Github and edit the WiFi access point name and password, and Mosquitto IP address in credentials.h header file. Flash all stations with this sketch. When powering up the stations, take note of the WiFi MAC address of all stations so you can distinguish them from one another. Write the MAC on the station casing.


 Mosquitto MQTT message broker

Install the Mosquitto message broker and authentication plugin mosquitto-auth-plug. Change the IP address of the computer to one you programmed to ESP32 station (or create a sub domain name). If you used Ubuntu/Kubuntu, shutdown mosquitto service and start it using the example configurations.

 sudo systemctl stop mosquitto
 cd iBeacon-indoor-positioning-demo
 mosquitto -v -c ./mosquitto-demo.conf

Positioning Dashboard

Dashboard React app subscribes the same MQTT topic “/beacons/office” where the ESP32 stations publish beacon data. Dashboard then calculates the positions of beacons in pixels, placing them on top of the background picture which represents the office floor layout.  Change the office floor map image to show your office or home layout, set server address in MessageStack/config.js and build the app.
Floorplan blueprint must be drawn on scale, so it's good to use a proper floor planner, try the free planner.roomsketcher.com.
Dashboard uses react-create-app, so you can start it in development mode or build a production release using commands

npm install

npm start
or
npm run build

Identify your ESP32 stations using the last three octets of MAC address, and drag-n-drop them to their correct place on the office floor map. Stations then hold their X,Y positions, pixels as units. Beacon X,Y positions are calculated relative to 3 stations. If a beacon is not in range of at least 3 stations, it is not visible on the floor map. Minimum of 3 stations is required to report the beacon for trilateration to work.


POC project

This project is a very simple proof-of-concept, showing and testing the ESP32 as a beacon scanning station. In this configuration the setup is not very accurate or fast. Stations do not report the locations synchronously so the position is quite jumpy. To improve accuracy, one should use faster beacons (interval) and average the RSSI value for more stable reading.
Taobao.com has lots of Android car radios available. I'w got one and wanted to take a look at it what kind of hardware it has. Building a custom car media center would be awesome, but then it is difficult to make the LCD fit nicely into car dashboard. These Android car radios look very nice when installed.

Hardware


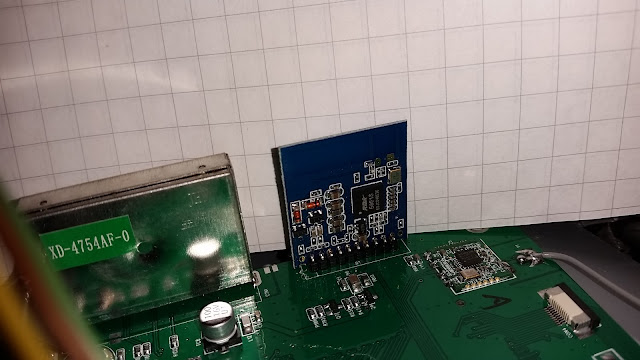
CPU in the PCB module is Allwinner R16, which has Quad-core Cortex™-A7 ARM processor. Same PCB module has GPS on it. Pinout of the module is unknown, please e-mail me if u find it.


Motherboard holding the PCB CPU module has FM radio receiver, power source, audio amplifier and Wi-Fi. Additional STM8S207RB processor running at 8MHz is probably for controlling the LCD, FM Radio or other parts during boot time. On startup the FM Radio starts fast, while Android takes much longer time to boot up.


More photos: https://photos.app.goo.gl/DG4PyaszG2QEj1NB3


Bluetooth module is based on RDA 5851S Bluetooth chip. FM Radio receiver is soldered inside sheet metal housing, which I did not desolder to see what chip is inside. The FM Radio part is really bad quality. It can not automatically change the frequency to follow the radio channel, and goes out of tune all the time. Receiver sensitivity is also bad, so there is often static and the sound quality is bad. Only with strong signal the sound quality is the same as with original Mazda car radio (which has internal CD changer in 2009 model).

Software

"Settings" -> "General" -> "Extra settings" has a access pin code, it is "123456"
"Developer mode" settings can be accessed with pin code "7890"
"USB Debugging" can be enabled with password "john@tw-desktop"
"Restore factory settings" has the same pin code as dev mode, "7890"

Malware/Spyware

Android has Chinese "connection app" DoFunCore.apk installed as a system program, which can not be removed. DoFun is a Chinese software company, offering a some sort of connection platform, to connect and track devices. App for example constantly reports GPS location to this service.

Rooting

Several attempts is required for the KingRoot to work, but it does work. Once the device halted completely and use of reset button was required. Finally rooting worked.
I used Titanium Backup to backup everything to USB stick.

Links


DoFunCore.apk analysis


Report ok
DateTime 2017-08-20 22:28:01 (Last analysis)
MD5 f7e1e64b9df95d9d60683c5a6d18cb6a
SHA1 ff4007444e1fdb704271ba9cc007c07fcc8e4653
SHA256 5d69aa491ba176efcfb14da910052d037a4bc844fc3173ab8e1be5d2ec1bb189
Filesize 45.8 kB (45818 Byte)
Filename dofuncore.apk
Packagename

com.dofun.dofuncore.main
ssdeep APK 768:08lqnBgjxZV9JaBNjPsGj8x0GVytNkI0O/aQb4pVUSY17T:kBaP3a0A8x0VtWI0O/vbKVUSC7T
SHA256 DEX 9f53162556a491eb11d48d4839bdb22f17afe178cdbc93e5cf6464d9bec142f1
ssdeep DEX 1536:tckF8bfSM0LgwsYdAHSQR1NS9X6QP6lksMQcyJs:ttF8mM0LgwsYdAHSQR12XMlks96
Date DEX 29.06.2013
Ad-supported No
Requested Permissions
android.permission.ACCESS_COARSE_LOCATION
android.permission.ACCESS_FINE_LOCATION
android.permission.ACCESS_NETWORK_STATE
android.permission.ACCESS_WIFI_STATE
android.permission.BLUETOOTH
android.permission.CHANGE_NETWORK_STATE
android.permission.CHANGE_WIFI_STATE
android.permission.DELETE_PACKAGES
android.permission.FORCE_STOP_PACKAGES
android.permission.INSTALL_PACKAGES
android.permission.INTERNET
android.permission.READ_EXTERNAL_STORAGE
android.permission.READ_PHONE_STATE
android.permission.RECEIVE_BOOT_COMPLETED
android.permission.WRITE_EXTERNAL_STORAGE
Responsible API calls for used Permissions
android/bluetooth/BluetoothAdapter;->getAddress
android/content/Context;->startService
android/content/pm/PackageManager;->installPackage
android/location/LocationManager;->requestLocationUpdates
android/net/ConnectivityManager;->getActiveNetworkInfo
android/net/ConnectivityManager;->getAllNetworkInfo
android/net/wifi/WifiManager;->getConnectionInfo
android/net/wifi/WifiManager;->isWifiEnabled
android/net/wifi/WifiManager;->setWifiEnabled
android/telephony/TelephonyManager;->getCellLocation
android/telephony/TelephonyManager;->getDeviceId
android/telephony/TelephonyManager;->getLine1Number
android/telephony/TelephonyManager;->getSimSerialNumber
android/telephony/TelephonyManager;->getSubscriberId
java/lang/Runtime;->exec
java/net/URL;->openConnection
Potentially dangerous Calls
getDeviceId
getLine1Number
getPackageInfo
getSimSerialNumber
getSubscriberId
getSystemService
printStackTrace
Read/Write External Storage
setWifiEnabled
Actions/Intents
android.intent.action.BOOT_COMPLETED
android.intent.action.MAIN
android.intent.category.DEFAULT
com.dofun.dofuncore.DESTROY_DAMEONSERVICE
com.dofun.dofuncore.DESTROY_MAINSERVICE
Activities
com.dofun.dofuncore.main.MainActivity
Receivers
com.dofun.dofuncore.model.BootReceiver
Services
com.dofun.dofuncore.model.DameonService
com.dofun.dofuncore.model.MainService
URLs
http://maps.google.cn/maps/api/geocode/json?latlng=
http://plat.dofun.cc/tools/uploadErrorLog
http://update.cardoor.cn:10256/terminal/software/update/car/android/dofuncore
http://update.cardoor.cn:10256/terminal/software/update/car/android/dofunsoftpackage
http://vehicle.cardoor.cn:10256/server/json/carInit.json
http://vehicle.cardoor.cn:10256/server/json/carLocationInfo.json


It's a Lingonberry season

Lingonberry or Cowberry, is the most common wild berry found in Finland. I have been collecting it every autumn for years now. This time collected a little too much for our freezer, so what would be a better use for it than put it in a brew! I wanted to do wheat beer for some time now, so I decided to use lingonberry in it too.


Lingonberry harvest

I boiled the berries in water (about 1kg), in the Grainfather malt cylinder, tho get the juice out.

Lingonberry juice boiled with water from 1kg of berries

Lingonberry Wheat Beer Recipe

  • Wheat Blond (Brewferm) 3EBC, 2 kg
  • Wheat Malt, Dark 14-18EBC (weyermann), 1 kg
  • Cara Amber 60-80EBC (weyermann), 1 kg
  • Cara Crystal 120EBC (brewferm), 1 kg
  • Pale ale malt 1 kg
  • Rice (boiled first) 0.34 kg
  • Hallertau Mittlefruh 30 + 30 g
  • Wyeast liquid yeast 1010
1.5 h in 67 C (50C -> 67C -> 75C)


Results

OG: 1.063
FG: 1.021
ABV: 5.5 %
The final product after two weeks from bottling, is very drinkable, but does not have much lingonberry aroma in it at all. For next lingonberry brew I will definitely use more berries, maybe 2 - 3 kg for 15 l batch.


Beers by color and weight


The government founded Finnish alcohol store Alko, has recently updated their website, to a more easily crawlable form. Thank you Solita for doing this. The website now uses AngularJS among other things.
Alko has done a good job of measuring the color (EBC) and weight (Plato) of their on-shelf beers, about 540 of them! EBC value is measured using spectrophotometer, which is why they have been able to measure values more accurately and outside of the visual EBC scale. Dark beers may all look black but in fact have very different colours.

Here is a scatter plot by weight versus colour. The Alko product page can give you more info of the beer, by clicking the datapoint.